Grow with Alaska SEED

ServicePortal FAQs
The ServicePortal allows our customers to access all of Alaska SEED and thread’s services in one place. Find answers to your ServicePortal questions here.
Logging In
When will the ServicePortal be available to users?
The ServicePortal is now available! We launched the ServicePortal to users at the end of May 2024.
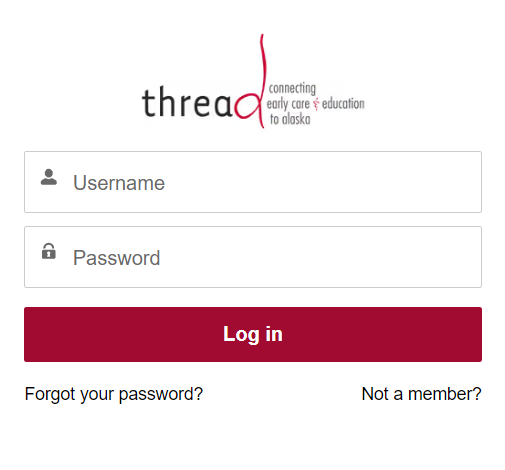
How do I log in for the first time?
If you have had an active Alaska SEED Registry membership in the past four years, you will receive an email from thread community or threadsalesforce@threadalaska.org. The subject will read “Welcome to the ServicePortal.” The email will include a welcome message with a link to follow to get started. Your username will be included in this email and is usually your personal email with .thread added to the end of it. For example, if your email is testuser@gmail.com, your username would be testuser@gmail.com.thread.
If you are a new member, navigate to the login page and click on “Not a member?” below the login button. Fill out all the fields on the screen. Check the box agreeing with the Terms & Conditions and then click Register. You will then be successfully logged in and redirected to your home page.
I forgot my password, or I need to reset my password. What do I do?
- Open the ServicePortal login page in a web browser.
- Click “Forgot Your Password.”
- Click “Username” and enter your portal username (your email with .thread added at the end).
- Click “Submit.” You will receive a password reset email. Follow the instructions in the email to reset your password.
- Click “Back to the login page.”
- Enter your username and the new password.
I forgot my username. What do I do?
Your ServicePortal account login is your (personal) email address with .thread added to the end.
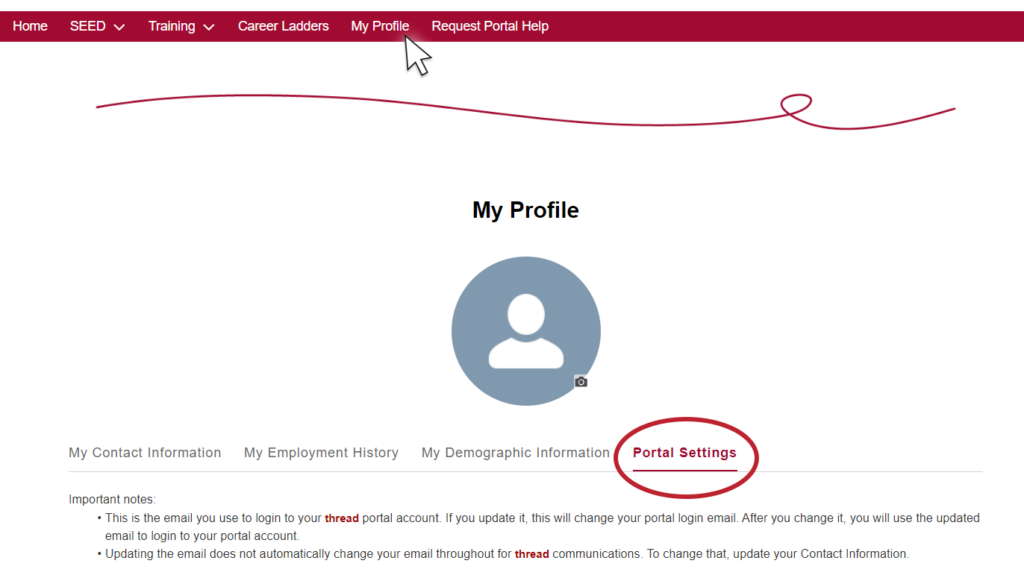
How do I change my username?
Your ServicePortal account login is your (personal) email address with .thread added to the end. Have a new email address? You can update your login by following these steps:
- Go to “My Profile” in your portal account.
- Navigate to the “Portal Settings” tab.
- Click the “Edit” button.
- Update your user information. You may:
- Update your first and last name.
- Update your email (Important note: This is the email you use to login to your ServicePortal account. If you update it, this will change your ServicePortal login email. After you change it, you will use the updated email to login to your ServicePortal account.)
Alaska SEED Registry
How do I apply to the Alaska SEED registry?
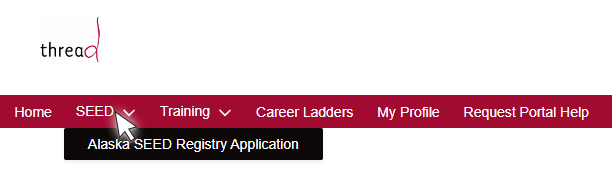
- Log into your ServicePortal account.
- Click on “SEED” in the red navigation menu across the top of the screen and then click “Alaska SEED Registry Application.”
- Please read the informational text on the screen and then click “Next” at the bottom right. You will be taken through several screens you will need to fill out until you reach final submission.
How do I renew my SEED registry?
- Log into your ServicePortal account.
- Click on “SEED” in the red navigation menu across the top of the screen and then click “Alaska SEED Registry Application.”
- Please read the informational text on the screen and then click “Next” at the bottom right. The system will automatically know if the application is for a renewal.
Why can’t I see all my past training documentation submitted with previous applications?
Your existing training records are still intact, and we are working to make that visible. At the moment, only thread training which has been entered into the ServicePortal is visible externally. Internally thread staff have access to your training documentation, but there is no connection yet for this to be visible externally. We are developing a “comprehensive transcript” which will include all training documents submitted. There is no release date set yet for this feature.
How to print/get my Alaska SEED Registry certificate?
Your certificate will be emailed to you once your application is successfully approved.
My Alaska SEED level is wrong. Who do I contact?
If your Alaska SEED level is wrong, please email info@seedalaska.org.
Training Registration
How do I register for a training?
- Log into your ServicePortal account.
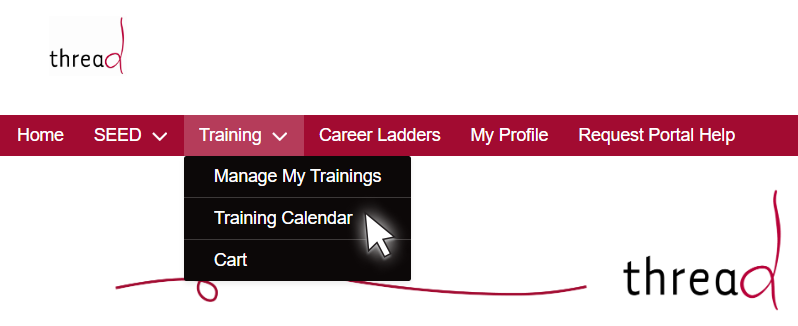
- Click on “Training” in the red navigation menu at the top of the screen.
- Click on “Training Calendar” from the drop-down menu.
- Click on the title of training you would like to take.
- Review the training details and then scroll down to the bottom of the screen and click “Register for Training.” You will be redirected to the cart checkout page.
- You will still need to click “Checkout” in order to complete the checkout process and be successfully registered for the training.
How do I cancel a training registration?
- Log into your ServicePortal account.
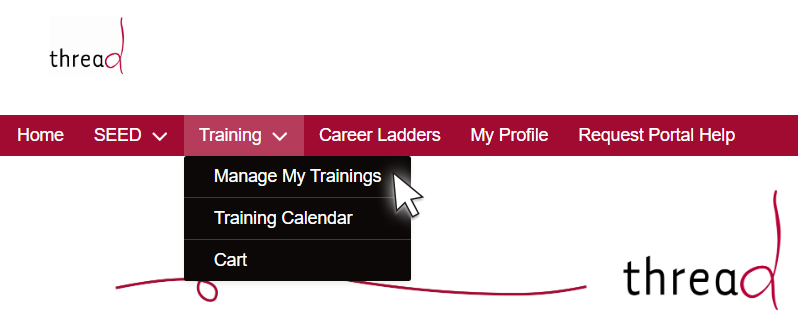
- Click on “Training” in the red navigation menu across the top of the screen.
- Click on “Manage My Trainings” from the drop down menu. Here you will see a list of trainings your are registered for.
- Click on the “Cancel A Training” tab.
- Select the circle to the left of the training you would like to cancel.
- Then click “I Want to Cancel This Registration.” The next screen will show you details for the training you would like to cancel.
- Make sure to scroll down to and click “Yes, Cancel Registration” in order to successfully cancel your training registration.
- The next screen will have a “Success! Your training registration for ”Test Training Title“ has been cancelled.” You can click “Done” to clear this message.
Where do I see what trainings I have registered for?
- Log into your ServicePortal account.
- Click on “Training” in the red navigation menu across the top of the screen.
- Then click on “Manage My Trainings” from the drop-down menu. Here you will see a list of trainings you are registered for.
How do I know where the training I registered for is located?
The training registration details will have a location field which will state whether the training is located in person or through zoom. The title of the training will also have the location in it.
Why can’t I see all my past trainings I have taken with thread?
Your existing training records are still intact, and we are working to make that visible. At the moment, only thread training which has been entered into the ServicePortal is visible externally. Internally thread staff have access to your training documentation, but there is no connection yet for this to be visible externally. We are developing a “comprehensive transcript” which will include all training documents submitted. There is no release date set yet for this feature.
Why will it not let me register for a training?
If you are receiving error messages when trying to register for a training, it may be because you have already registered for the training. Please navigate to the “Manage my Trainings” page and check to see if you have already registered. Make sure to click on the “Waitlisted” tab to make sure you are not already waitlisted for the training as this could cause errors as well.
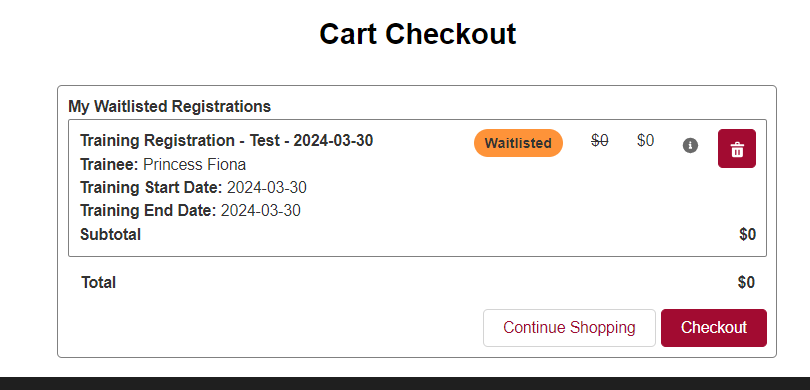
What does it mean when it says I have been waitlisted for a training?
When a training has reached capacity, the details page will show that there are no seats remaining. However, if a spot opens up due to a cancelation, you may have the opportunity to join the training if you are on the waitlist. You can click “Register for Training” to start the process of being added to the waitlist. You will be redirected to the cart checkout page. You will still need to click “Checkout” in order to complete the checkout process and be successfully waitlisted for the training.
How and when will I know that I have gotten into a training I was waitlisted for?
When a spot becomes available for a training you were waitlisted for, you will receive an email that a spot has opened. It will be first come, first serve. You will have to reach out to thread at 800.278.3723 in order to register for the training.
Why am I not receiving training registration emails?
If you are not receiving automated emails for training registration details, the training survey, or training certificates, you may have selected to opt out of emails at some point. To opt back in to receiving emails, click on “My Contact Information” in the middle of the screen, scroll down and make sure “Email Opt Out” is not checked, and click “Save.” This will opt you back in to receiving emails.
How do I register my staff for training?
- Access the Training Calendar by clicking on “Training” in the red navigation menu across the top of the screen.
- Then click on “Training Calendar” from the drop-down menu.
- Once you find the training you would like to register your staff for, click on the training title.
- The next screen will show you a list of staff available to register for the selected training. If your staff list needs updating, ask your (current and former) staff members to update their employment information in their ServicePortal account.
- Select the staff members you would like to register and then click “Next.”
- Each staff member you registered will show up as a separate item in your cart. Review the items listed and then click “Checkout” at the bottom right to successfully register your staff members for the selected training.
- A brief “Success!” message will appear and then you will be redirected back to the training calendar.
Why can’t I see my staff in order to register them for a training?
If your staff list needs updating, ask your (current and former) staff members to update their employment information in their ServicePortal account(s).
How do I allow my administrator to register me for training?
On the home screen, you have access to your employment history. Click the arrow to the right of the employer you wish to grant access to register you for training. Click Edit. Here you can enable your administrator to register you for trainings.
Additionally, when adding employment information in the Alaska SEED Registry application screen flow, you have selections you can choose to allow your administrator to register you for trainings. If you need help adjusting these settings, please email Alaska SEED at info@seedalaska.org.
Updating Contact Information & Employment History
How do I update my place of employment?
Log into your ServicePortal account and click on “New Employer” in the center of the screen. Fill out the required information and click “Create New Employment Record.”
My employment history is wrong. How do I fix that?
On the home screen, you have access to your employment history. Click the arrow to the right of the employer you wish to edit. Click “Edit” from the drop down menu. You can also click New Employer on this screen and add additional employment missing from your history. If you need to delete an employment record that is incorrect, please reach out to Alaska SEED at info@seedalaska.org.
How do I update my contact information?
Log into your ServicePortal account. Click “My Contact Information” in the center of the screen. Edit any information you would like to change. Click “Save” in the middle of screen if only editing Gender, Marital Status or Ethnicity/Race. Click “Save” at the bottom right of the screen if editing any other information.
How do I update my demographic information?
Log into your ServicePortal account. Click “My Demographic Information” in the center of the screen. Edit any information you would like to change. Click “Save” at the bottom right of the screen.
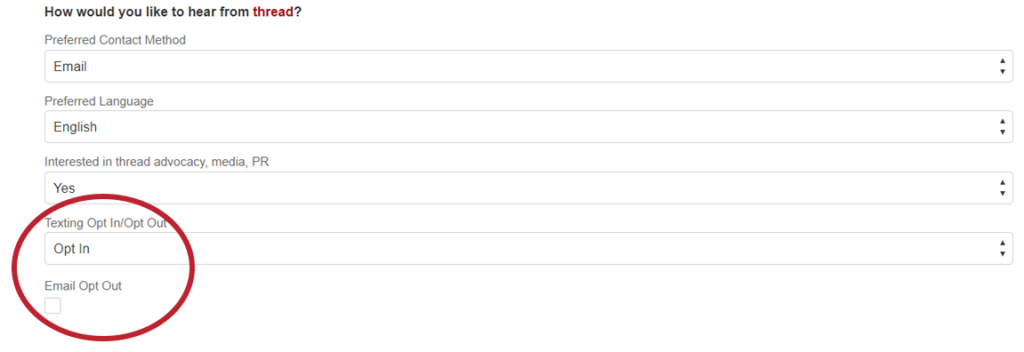
How to opt in/out of texting?
To opt in or out of receiving emails, click on “My Contact Information” in the middle of the screen, scroll down and review your email and texting opt in and out selections. Click “Save” once your choices are made.
How to opt in/out of emails?
To opt in or out of receiving emails, click on “My Contact Information” in the middle of the screen, scroll down and review your email and texting opt in and out selections. Click “Save” once your choices are made.